



There are three practical, compliant ways to move LinkedIn contacts or Sales Navigator leads into a CRM: use an official CRM sync (Sales Navigator or LinkedIn Recruiter CRM Connect), run a manual CSV export of your first-degree connections, or use a privacy-first local browser exporter like Mastros. Here's how to pick the right one fast. Mastros lets you export LinkedIn search results to Excel or CSV, Sales Navigator leads included.
Quick method selector:
- Official CRM Sync (Sales Navigator / Recruiter CRM Connect): Best for ongoing pipeline tracking and activity writeback. Requires Sales Navigator Advanced or Advanced Plus licensing. Continuous, low-maintenance once set up.
- Manual CSV export: Best for one-off imports or seeding a new CRM with your existing network. Free, no extra tools needed, but limited to first-degree connections with minimal fields.
- Mastros local browser exporter: Best for bulk Sales Navigator lists, search results, or recruiter pipelines where you need enrichment-ready files without sending data to an external server. Works locally in your browser.
Pro Tip: If you only need to move a few hundred connections once, the CSV export is the right call. If you're running an active sales or recruiting pipeline, skip straight to Method A or Method C.
Key Takeaways
Exporting LinkedIn contacts to a CRM works best when you match the method to your volume, license tier, and compliance requirements.
| Point | Details |
|---|---|
| Three practical methods | Use CRM Sync for ongoing pipelines, CSV export for one-off imports, and Mastros for bulk local exports. |
| License gates matter | Sales Navigator CRM Sync requires Advanced or Advanced Plus; Recruiter CRM Connect requires a corporate Recruiter license. |
| Emails are never included | LinkedIn exports omit personal emails and phones; plan to enrich records separately after import. |
| Preserve source metadata | Tag every import with lead source, list name, and export date to make records actionable, not just stored. |
| Mastros for local, compliant exports | Mastros processes Sales Navigator and LinkedIn data locally in your browser, producing CRM-ready CSV or JSON files without external data transfer. |
Table of Contents
- When does LinkedIn allow or block exports?
- Method A: How to set up official CRM syncs with Sales Navigator and Recruiter
- Method B: How to manually export LinkedIn connections to CSV
- Method C: How Mastros exports LinkedIn data locally and privately
- How to import exported LinkedIn data into Salesforce, HubSpot, Dynamics 365, and Zendesk Sell
- Best practices for preserving context and keeping your CRM clean after import
- Common export and import problems, and how to fix them
- What the convenience-vs-compliance trade-off looks like in practice
- Mastros gives you a faster, privacy-safe path from Sales Navigator to your CRM
- Sources
- FAQ
When does LinkedIn allow or block exports?
LinkedIn exposes a narrow slice of data through official export paths. The manual connections export gives you first-degree connections only, with fields limited to first name, last name, current company, job title, and LinkedIn profile URL. No emails, no phone numbers, no second-degree contacts.
Sales Navigator adds structured lead and account data inside the platform, but what it actually exports depends on your license tier. CRM Sync (writeback of names, titles, LinkedIn URLs, and activity logs) requires Sales Navigator Advanced or Advanced Plus. The standard Sales Navigator Core plan does not include CRM writeback.
LinkedIn's Terms of Service prohibit automated scraping of profile data using bots or unauthorized third-party tools. Server-side scraping tools that harvest data by impersonating a browser session carry real account-suspension risk. Local, read-only export patterns that only process data already visible in your authenticated session are a meaningfully different risk profile.
Before you export, check these:
- Your Sales Navigator license tier (Core vs. Advanced vs. Advanced Plus)
- Whether your CRM is on LinkedIn's supported list for native sync
- Team licensing: CRM Sync requires each user to authenticate individually
- Consent requirements if you're exporting contacts in a GDPR-regulated context (see the GDPR-compliant export guide for a practical checklist)
Pro Tip: LinkedIn profile URLs are stable identifiers. Even when emails are missing from an export, the profile URL lets you dedupe and enrich records later without creating phantom duplicates.
Method A: How to set up official CRM syncs with Sales Navigator and Recruiter
Use CRM Sync when you want LinkedIn activity (InMail sends, profile views, notes) written back to your CRM automatically, without manual imports. It reduces pipeline maintenance overhead significantly once it's running.
License requirements at a glance:
- Sales Navigator Advanced Plus or Microsoft Relationship Sales for full Dynamics 365 writeback and the "Add to CRM" button inside Sales Navigator
- Sales Navigator Advanced for HubSpot CRM Sync via the HubSpot Marketplace integration
- LinkedIn Recruiter (corporate tier) for CRM Connect, which includes One-Click Export, Profile Plugin, In-CRM indicators, and API modules for syncing candidate pipelines
Setup steps for Sales Navigator CRM Sync (HubSpot or Salesforce):
- Go to Sales Navigator Settings → CRM Settings → Connect CRM.
- Select your CRM (HubSpot, Salesforce, or Dynamics 365) and authenticate with your CRM admin credentials.
- Choose which objects to sync: contacts, companies, deals, and activity owners.
- Map LinkedIn fields to CRM fields (names, titles, LinkedIn URLs, account names).
- Enable "Add to CRM" in Sales Navigator so reps can push leads with one click.
- Run a test sync on a small lead list and verify records appear correctly in your CRM.
What gets synced — and what doesn't:
- Names, job titles, LinkedIn profile URLs, company names: yes
- InMail activity logs and notes: yes (Advanced Plus)
- Personal emails or phone numbers: no — plan to enrich separately
- Dynamics 365 surfaces Sales Navigator controls (Top Card, mutual connections, Account IQ) directly inside CRM forms, which is useful for warm introductions without leaving the CRM
Pro Tip: Duplicate risk is highest on the first sync. Before enabling writeback, run a dedupe pass in your CRM using LinkedIn profile URL as the matching key. Most CRMs let you set this as a unique identifier.
Method B: How to manually export LinkedIn connections to CSV
The manual CSV export is the simplest path for one-off imports. No extra tools, no license requirements, and it takes about five minutes.
Step-by-step:
- Log in to LinkedIn and click Me (your profile icon, top right).
- Go to Settings & Privacy → Data privacy → Get a copy of your data.
- Select Connections (or "Want something in particular?" and choose Connections).
- Click Request archive and wait for the email (usually arrives within 10 minutes).
- Download the ZIP file and open
Connections.csv. - Confirm the file is UTF-8 encoded before importing (open in a text editor, not Excel, to check).
What you get — and what's missing:
- Columns: First Name, Last Name, Email Address (often blank), Company, Position, Connected On, LinkedIn Profile URL
- First-degree connections only
- No phone numbers, no secondary emails, no profile photos
- Encoding issues are common if you open the CSV in Excel on Windows before importing — always check in a plain text editor first
Pro Tip: Add a "Source" column manually before importing, and fill it with "LinkedIn Connections Export" plus today's date. That single column saves hours of cleanup when you're auditing CRM records six months later.
Method C: How Mastros exports LinkedIn data locally and privately
Mastros takes a different approach. The Mastros LinkedIn Data Exporter runs as a Chrome extension and processes everything locally in your browser. No data is sent to an external server. That distinction matters when you're handling prospect lists under GDPR or your company's data-handling policy.
What Mastros can export:
- LinkedIn people search results and company pages
- Sales Navigator lead lists and account lists
- LinkedIn Recruiter pipeline results
- Post engagement lists (people who liked or commented)
- Output formats: CSV, JSON, or JSONL, ready for CRM import or enrichment
Why local processing reduces compliance risk: Server-based scraping tools route your session data through a third-party server, which creates a data-transfer event under GDPR and similar frameworks. Mastros processes the visible page data inside your own browser session, so the data never leaves your machine until you save the file.
Setup steps:
- Install the Mastros Chrome extension from the Chrome Web Store.
- Log in to LinkedIn (or Sales Navigator / Recruiter) in the same browser.
- Run your search or open your lead list in Sales Navigator.
- Click the Mastros extension icon and select the export type (People, Companies, Leads, Accounts).
- Let the extension scroll and collect visible results, then click Export.
- Save the CSV or JSON file to your local machine.
Limits to know: Mastros exports what's visible in your authenticated session. It respects LinkedIn's rate limits and does not automate clicks or form submissions. Avoid running exports at a pace that mimics bot behavior — slow, deliberate exports are both safer and more reliable.
How to import exported LinkedIn data into Salesforce, HubSpot, Dynamics 365, and Zendesk Sell
The import pattern is consistent across CRMs: clean your CSV, map fields, set dedupe rules, then import and verify. Mapping LinkedIn fields carefully and enabling "update if exists" prevents the most common data quality problems.
Standard field mapping reference:
| LinkedIn export field | CRM field | Notes |
|---|---|---|
| First Name | First Name | Required in all CRMs |
| Last Name | Last Name | Required in all CRMs |
| Position | Job Title | Map to "Title" in Salesforce |
| Company | Account / Company Name | May auto-create Account records |
| LinkedIn Profile URL | LinkedIn URL (custom field) | Use as dedupe key when email is missing |
| Source (manual column) | Lead Source | Set to "LinkedIn" or list name |
CRM-specific notes:
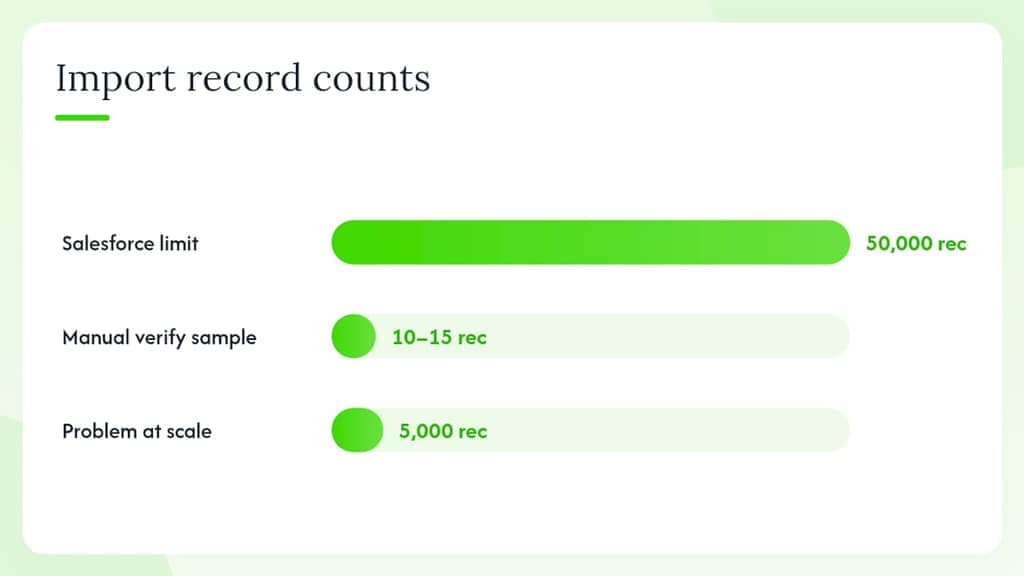
- Salesforce: Use the Data Import Wizard for under 50,000 records. Required fields are Last Name and Company. Map LinkedIn URL to a custom field and set it as an external ID for deduplication.
- HubSpot: Go to Contacts → Import → File. HubSpot dedupes by email by default; add LinkedIn URL as a secondary identifier. The HubSpot LinkedIn CRM Sync app handles ongoing sync separately from one-off CSV imports.
- Dynamics 365: Use the import wizard or the Sales Navigator integration for native sync. For CSV imports, map to Contact entity fields and set duplicate detection rules before running.
- Zendesk Sell: Follow the Zendesk import flow — Contacts → Import → CSV. Zendesk maps columns interactively before finalizing.
Pro Tip: Always import into a test view or a staging segment first. Verify 10–15 records manually before merging the full list. Catching a field-mapping error on 15 records is a five-minute fix; catching it on 5,000 records is not.
Best practices for preserving context and keeping your CRM clean after import
Importing contacts without context is the most common mistake. A raw list of names and LinkedIn URLs tells your CRM nothing about why those people are in your pipeline. Tagging imports with source metadata — list name, campaign, event, or search query — is what turns a data dump into a usable prospecting asset.
Practical steps to preserve context:
- Add a "Lead Source" column before importing: use values like "Sales Nav Search — Q2 2026 ICP," "LinkedIn Event Attendees — [Event Name]," or "Recruiter Pipeline — Senior Engineers."
- Include a "Date Exported" field so you know how fresh the data is.
- Add notes about the interaction context: did you connect after a post comment, a mutual connection intro, or a cold outreach?
- Tag records with the campaign or sequence they belong to so your CRM can filter and report accurately.
On enrichment: LinkedIn exports don't include emails or phone numbers. If you need direct contact data, use a compliant enrichment service (Apollo, Clay, Cognism, or similar) after import. Always check the enrichment provider's data sourcing and consent model before use, particularly for EU-based contacts.
Hygiene rules that actually matter:
- Assign an owner to every imported record immediately. Unowned records go cold fast.
- Schedule a first-touch task or sequence enrollment at import time, not later.
- Run a dedupe audit 48 hours after import, once the CRM has processed all records.
- Review duplicates before merging — a merge is hard to undo cleanly in most CRMs.
Common export and import problems, and how to fix them
Most errors fall into a short list of predictable categories.
Frequent issues and quick fixes:
- Encoding errors (garbled characters): Re-export the CSV and save as UTF-8. In Excel, use "Save As → CSV UTF-8 (Comma delimited)" rather than the default CSV option.
- Missing columns after import: Open the raw CSV in a text editor and confirm the header row matches what the CRM expects. A single extra space in a column name breaks mapping.
- Empty email fields: Expected. LinkedIn's connections export rarely includes emails. Use LinkedIn URL as your primary identifier and enrich emails separately.
- Duplicate records after import: Enable "update if exists" in your CRM's import settings. Map LinkedIn URL as a unique identifier to catch duplicates even when emails differ.
- Sync mismatch in Sales Navigator CRM Sync: Check that each user has re-authenticated after a password change or CRM token expiry. Token expiry is the most common cause of silent sync failures.
Sales Navigator-specific issues:
- Export button grayed out: Your license tier doesn't support that export type. Check whether you're on Core, Advanced, or Advanced Plus.
- "Insufficient permissions" error: Your CRM admin hasn't granted the LinkedIn integration the required OAuth scopes. Re-authenticate with admin credentials.
- Lead list not syncing: Confirm the list was saved in Sales Navigator (not just filtered) and that the CRM connection is active under Settings → CRM Settings.
When to escalate: If the error is inside your CRM's import log (field validation failures, required field errors), that's a CRM configuration issue — contact your CRM admin or support. If the error is a LinkedIn permission or license message, contact LinkedIn Sales Solutions support directly.
What the convenience-vs-compliance trade-off looks like in practice
The appeal of server-side scraping tools is obvious: they're fast, they pull more fields, and they require less manual setup. But that convenience comes with a real cost that most guides understate.
When your export tool routes data through an external server, you've created a data-transfer event. Under GDPR, that means you need a legal basis for the transfer, a data processing agreement with the vendor, and a clear retention policy for what they store. Most sales teams running fast-moving outreach campaigns don't have those agreements in place. That's not a hypothetical risk — it's the kind of gap that surfaces during audits or when a prospect asks how you got their data.
Local exports, by contrast, keep the data on your machine from the moment it's collected. The compliance surface is smaller, the audit trail is cleaner, and you're not dependent on a third-party vendor's security posture. That's why Mastros was built the way it was: the browser does the work, and the file goes straight to you.
The other underrated advantage of local exports is data quality. Server-side tools often pull stale cached profiles or hit rate limits that produce incomplete records. A local export reflects exactly what LinkedIn shows you in your authenticated session — which is the freshest, most accurate version of that profile data available.
Mastros gives you a faster, privacy-safe path from Sales Navigator to your CRM
If you're working with Sales Navigator lead lists, recruiter pipelines, or LinkedIn search results at any real volume, the manual CSV export won't cut it and the native CRM sync won't cover every use case. The Mastros LinkedIn Data Exporter fills that gap: it exports visible LinkedIn data locally in your browser, produces clean CSV or JSON files ready for CRM import, and never routes your prospect data through an external server.
Where the native sync writes back only a narrow set of fields and requires Advanced Plus licensing, Mastros lets you capture the full visible profile, add source metadata before export, and bring enrichment-ready files directly into Salesforce, HubSpot, Dynamics 365, or any CRM that accepts a standard CSV. Start with the free plan to test your export workflow, then scale up as your list volume grows. Install the extension and run your first export at Mastros.
Sources
Official documentation and practical how-tos for each setup task:
- Integrate Sales Navigator with Dynamics 365 Sales — Microsoft Learn
- Connect HubSpot and LinkedIn CRM Sync — HubSpot Knowledge
- Importing contacts from Linkedin into Sell — Zendesk Support
- How to import contacts from LinkedIn? — Freshsales support
- Import LinkedIn connections — Toolblocks Docs
- Streak integrations — LinkedIn integration notes
FAQ
Can you export LinkedIn contacts directly to a CRM?
Yes, through three routes: LinkedIn's native CRM Sync (Sales Navigator or Recruiter CRM Connect), a manual CSV export of first-degree connections, or a local browser exporter like Mastros. Each method has different license requirements and data coverage.
Does LinkedIn's CSV export include email addresses?
Rarely. The connections CSV includes name, company, title, and LinkedIn profile URL, but the email field is almost always blank. You'll need a separate enrichment service to add verified contact data.
What license do you need for Sales Navigator CRM Sync?
Sales Navigator Advanced or Advanced Plus for most CRM integrations; Microsoft Relationship Sales for full Dynamics 365 writeback. The Core plan does not include CRM Sync.
How do you avoid duplicate records when importing LinkedIn contacts?
Map the LinkedIn profile URL as a unique identifier in your CRM's import settings and enable "update if exists." Since emails are often missing from LinkedIn exports, the profile URL is the most reliable deduplication key.
Is it safe to use a browser extension to export LinkedIn data?
A local browser extension that only reads visible page data in your authenticated session carries lower compliance risk than server-side scraping tools. Mastros processes data locally and never sends it to an external server, which keeps the data-transfer surface small and the audit trail clean.